Preparing Adobe InDesign template for use with SILK PLM system
HOW TO QUICKLY GENERATE TAGS FOR ALL PRODUCTS FROM ONE TEMPLATE?
In the SilkPLM system, we took advantage of the possibilities offered by Adobe’s program InDesign to automatically generate branding elements.
Graphic designers prepare visual branding elements, e.g. a template, and the product data on these graphics is completed automatically by transferring selected information from the SilkPLM system to the indicated branding element.
WHAT PROBLEMS WE WILL SOLVE:
- When importing products from many countries, we are required to indicate, on the product label or leaflet, the country of origin – with us this information automatically updates, depending on the supplier, the order.
- There is a need to add pictograms or other information about operating conditions, washing methods, maintenance, sizes, material composition, etc. – in our system, these branding elements complement each other based on the data entered for each product.
- We change the type of tag, flyer, handtag, etc. – the right graphic design (prepared in advance by graphic designers) can be plugged into the product and automatically generate the right data on it.
- Each product should have an EAN – the generation of EAN Stickers, etc. is done automatically based on data from the system. We can also generate PriceStickers, promotion information, etc. on the same basis.
Graphic designers prepare one template for all products in Adobe InDesign. This template, with an extension of .INDD, is then, in a quick way, plugged into the products for which it is to generate. Our system SilkPLM completes the data and generates the correct branding elements in an automated manner.
The indicated information is added from the SilkPLM system to the branding element created by the Graphic Designer. At the time of ordering, all necessary graphic designs are included.
WAŻNE POLA W SYSTEMIE SilkPLM – czyli JAK I GDZIE DODAĆ PLIK Adobe InDesign (.indd) ?
Pliki graficzne należy podpiąć najpierw do odpowiedniego słownika.
DICTIONARIES –> Products in Seasons – Branding –> Brandings Details

Podpinamy je w polu Attachment nowo stworzonego bądź istniejącego już elementu w słowniku Brandings Details.
Można załączyć kilka plików, nie musi być jeden.

Po podpięciu pliku graficznego (.indd) w odpowiednim słowniku, przechodzimy do modułu PRODUCTS.
Z listy produktów wybieramy właściwy, wchodzimy w szczegóły (details). Następnie przechodzimy do zakładki Products in Season i tu wyszukujemy kolejną zakładkę Brandings Settings.
Na dole mamy listę o nazwie Brandings Details.

Tu możemy wybrać rodzaj elementu brandingowego potrzebnego na danym produkcie oraz wybrać plik graficzny (z listy), który powinien zostać podpięty do produktu. Należy pamiętać, że w naszym systemie SilkPLM elementy brandingowe, które są przypisane do produktów, są jednocześnie tymi, które w trakcie składania zamówienia przesyłane są w pliku do dostawcy.
Następnie przechodzimy do zakładki Brandings.
Products in Season → zakładka Brandings
Kolejne wpisy w tej zakładce pokażą się dopiero w momencie stworzenia zamówienia na ten produkt. Wchodząc w szczegóły jednego z wpisów zobaczymy pole informujące o załączonych elementach brandingu.
Każde kolejne zamówienia na ten produkt mogą mieć różniące się między sobą elementy brandingu, np. gdy zmienia się dostawca.
Wchodzimy na szczegóły karty Brandings. Na dole karty mamy pole:

This is where all the branding elements generated for the Product, in a given order, are shown. Often, these are formattas added for a given product category and are generated automatically in PDF format.
Tapping into branding elements with properly prepared Adobe templates InDesign will result in they will be filled with the indicated data from this product. The moment we click “generate pdf”, this INDD file will be processed, the data from the product will be entered into it and a PDF will be generated.
When a PDF with branding is created, the previously indicated tagged data is retrieved from the system and the template is merged into the actual document (it will contain the necessary data – barcodes, names, numbers, country of origin, etc.).
In the SilkPLM System in Product in Season →under the Branding tab, further entries are generated with each order.

Going into the details of such an entry, we see a menu:

Przyciski od prawej to:
1. ![]() przycisk który generuje cały zapis XML z tagami
przycisk który generuje cały zapis XML z tagami
2. ![]() przycisk historia – możemy przejrzeć całą historię zmian na danym produkcie
przycisk historia – możemy przejrzeć całą historię zmian na danym produkcie
3. ![]() przycisk blue sticky note – generuje niebieską karteczkę.
przycisk blue sticky note – generuje niebieską karteczkę.
Po kliknięciu przycisku ![]() XML generuje się nam pełny plik z wszystkimi możliwymi w tym produkcie tagami – na podstawie wprowadzonych do karty Produktów danych. Poniżej wycinek przykładowego xml-a
XML generuje się nam pełny plik z wszystkimi możliwymi w tym produkcie tagami – na podstawie wprowadzonych do karty Produktów danych. Poniżej wycinek przykładowego xml-a
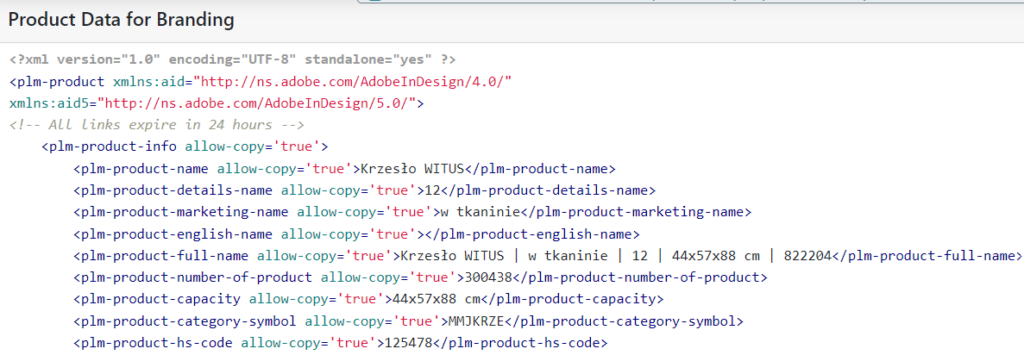
Pokazujący się w tym miejscu plik XML należy skopiować do np. pliku tekstowego i zapisać z rozszerzeniem XML.
Na końcu listy XML wprowadziliśmy dwa dodatkowe Tagi, a mianowicie Clone data i User data. Pozwala obejść pewne ograniczenia, które Adobe narzuca na te struktury – o tym w dalszej części tego dokumentu.
Następnie przechodzimy do Adobe InDesign
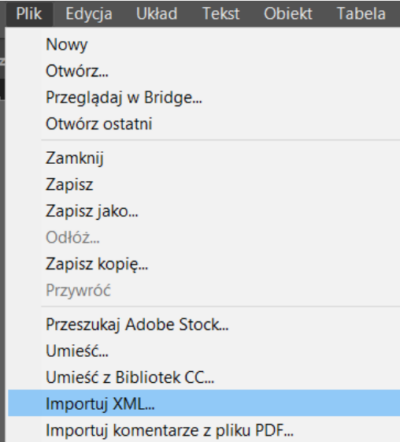
Plik→Importuj XML…
Wskazujemy nasz zapisany plik.
Importujemy.
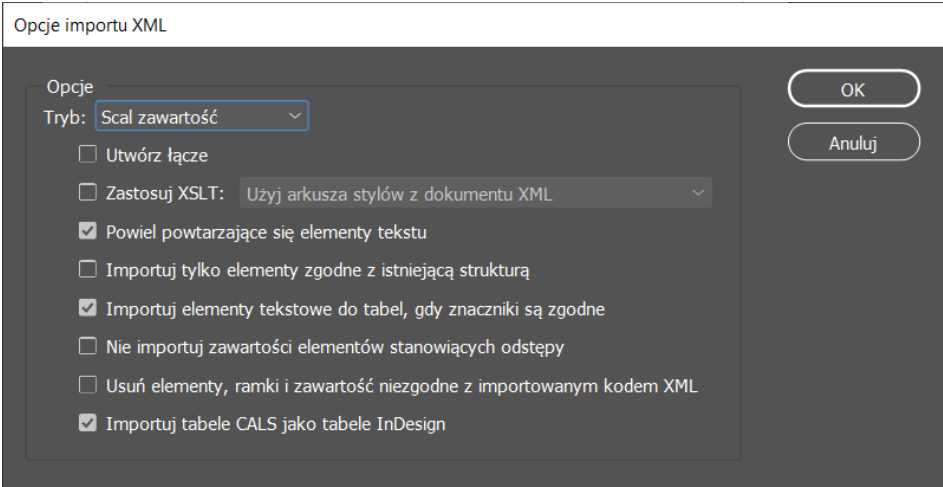
In the next step, we click OK.
The XML file has now been imported into our document. At the same time, the panels Structure and Tags of the document have been filled with elements of the XML file.
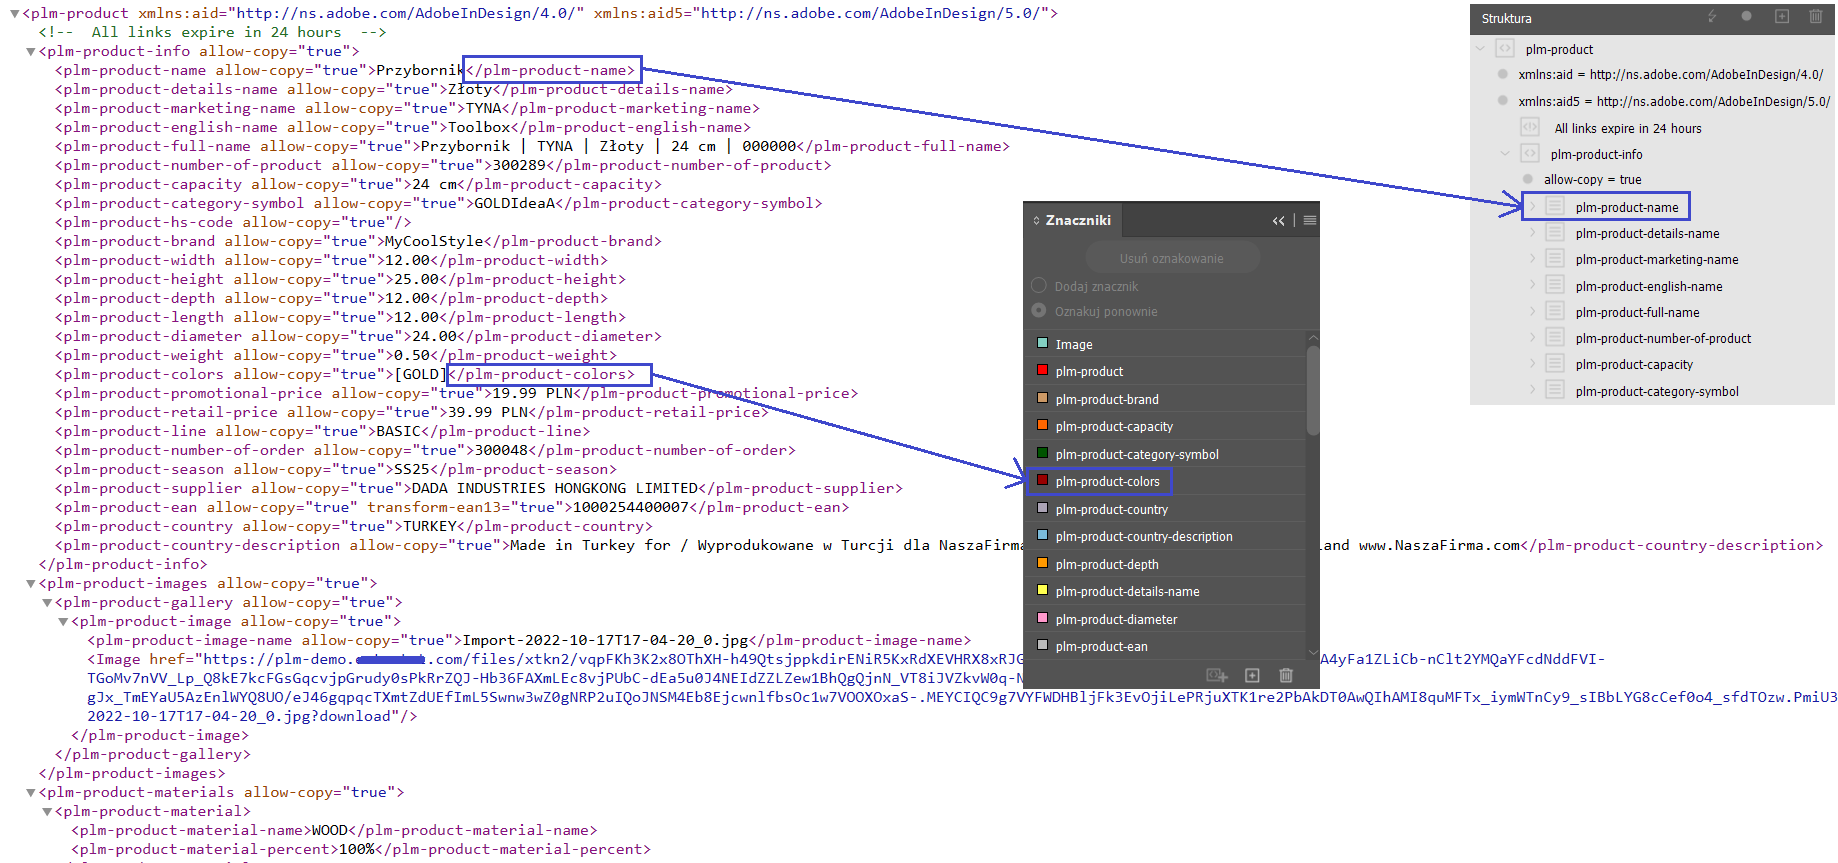
W strukturze XML, w celu wyróżnienia, unikalne tagi mają dodaną flagę: <allow-copy=”true”>
Jeśli będzie potrzeba podpięcia pod formatkę tagu, którego nie ma w zaimportowanym XML można wejść na Moduł: Brandings Parameters.
W tym module są wyszczególnione wszystkie możliwe w systemie tagi w formie XML-a, niezbędne do stworzenia formatek graficznych w programie Adobe InDesign. Można je przekopiować i wkleić do pliku z XML przygotowywanego do pracy z wspomnianym programem graficznym.
Widok podzielony jest na sekcje:
- Product Info
- Product Materials
- Product MaterialsProduct Dynamic Attributes
- Product Images
- All Dynamic Attributes
- All Pictograms
- All Images Tags
- This is a place where your tags are copied
STRUCTURE AND TAGS
Panel Structure contains all the elements from the imported XML. We can add, edit and delete elements and attributes to/from an existing structure.
To the panel Structure is accessed via View → Structure → Show Structure.
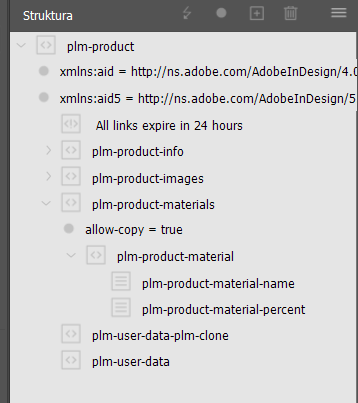
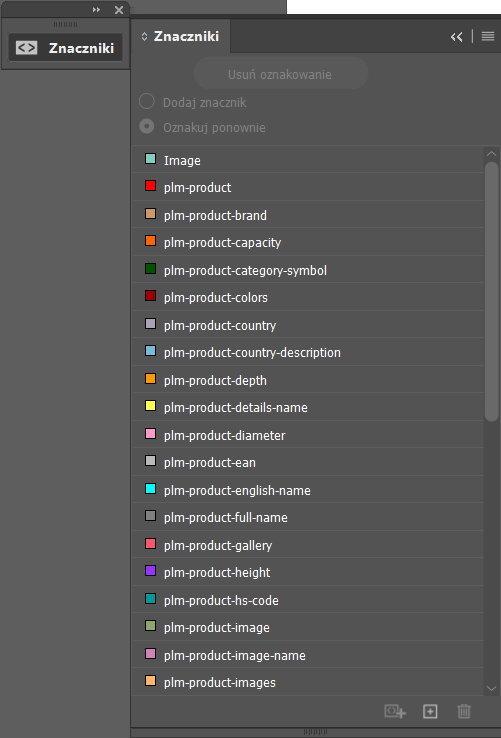
The second very useful tool is Tags.
In this panel we see a list of all the tags used to assign XML elements. The list will appear with the imported XML file.
We can assign tags to text and alternate images.
To panel Tags is accessed through Window → Uses → Tags.
CREATING AN InDesign TEMPLATE
Now we’ll look at creating a document with the text formats we need.
Start a new Adobe InDesign document via File → New → Document.
We will focus on the main technical issues related to placing the correct Tags from the product on the format.
The question of the graphic solution is left to the graphic designers.
LIMITATIONS:
- You can use fonts available for Windows 10 and those defined under Google. If the customer needs their own – custom – they can be uploaded to a server that supports this functionality. On the other hand, you cannot embed these fonts yourself in an INDD document.
- The second limitation is the use of external links to add a graphic element. This is not supported, so all images, graphics must be pasted in the template, otherwise they will not generate in the PDF.
In the templates, everything has to be post-linked, in the links box we check the option to have all graphics go into the document. Such a complete document needs to be attached to the SilkPLM system and then everything will be properly generated.
In the SilkPLM system we do not change the structure of the XML, it is fixed. In Adobe InDesign, this structure can be changed as needed.
We create a text box and drag the selected tag from the panel Structure and drop in the text box or assign tags to the document from the panel Tags.
The text field will then be filled with all the values and images contained in the structure.
We dragged the whole group – therefore, the frame was filled with all the fields from this group.
At the same time, all tags show up and on the panel Structure and on the panel Tags.
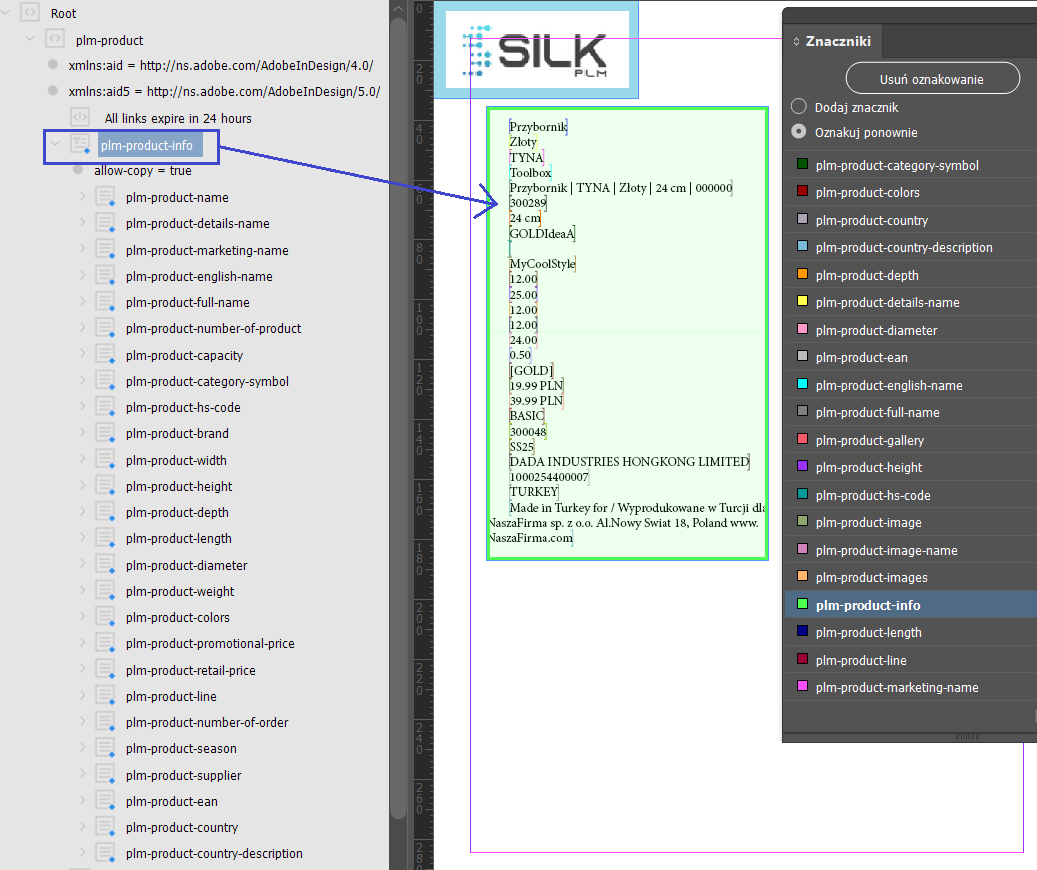
All fields pasted from XML are marked with square brackets and color coded to match the panel Tags.
Note that unwanted characters (such as tabs and paragraphs) may have been inserted next to the imported fields. A useful tool to remove these characters can be found by selecting the text and choosing Edit → Edit in the Thread Editor.
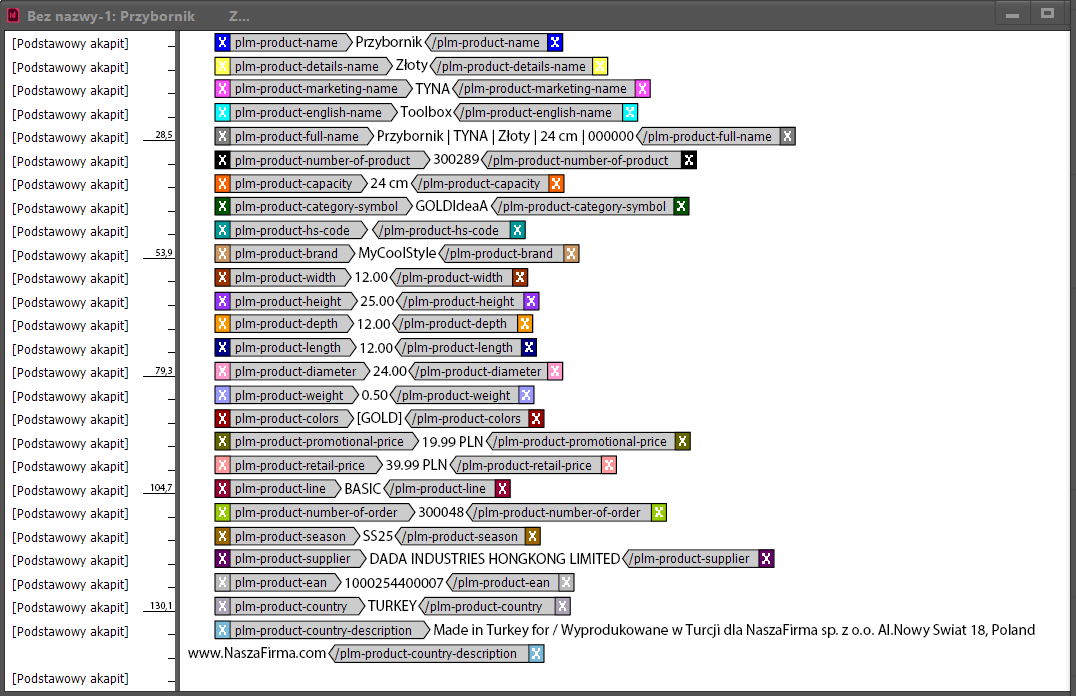
To show hidden characters select the text frame press Text→Show hidden characters.
Removing the selected characters will allow you to properly arrange the text on the designed template and add the fixed elements – below the added text “NAME:”.
As you can see, the Square Brackets specifying fixed data from the product are exactly in the color of the tags – this makes it easier to find the desired data.
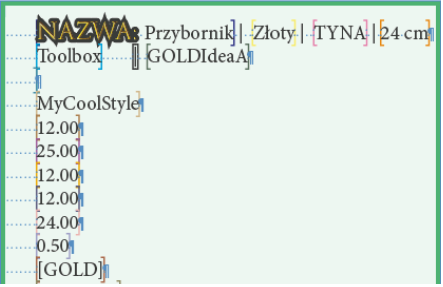
Attention! Making changes to the text directly in the text box gives the same results as modifications made in the Thread Editor. Using the Thread Editor, however, we will see full XML field names (not just simple brackets). This expanded form can dramatically simplify the editing process.
We can now customize our fields using Adobe InDesign’s graphics tools (paragraph styles, character styles, border options, etc.). In our example, we removed unnecessary Tags, arranged the content and added labels in front of the fields.
Of course, the graphic design is individually given by the Graphic Designer.
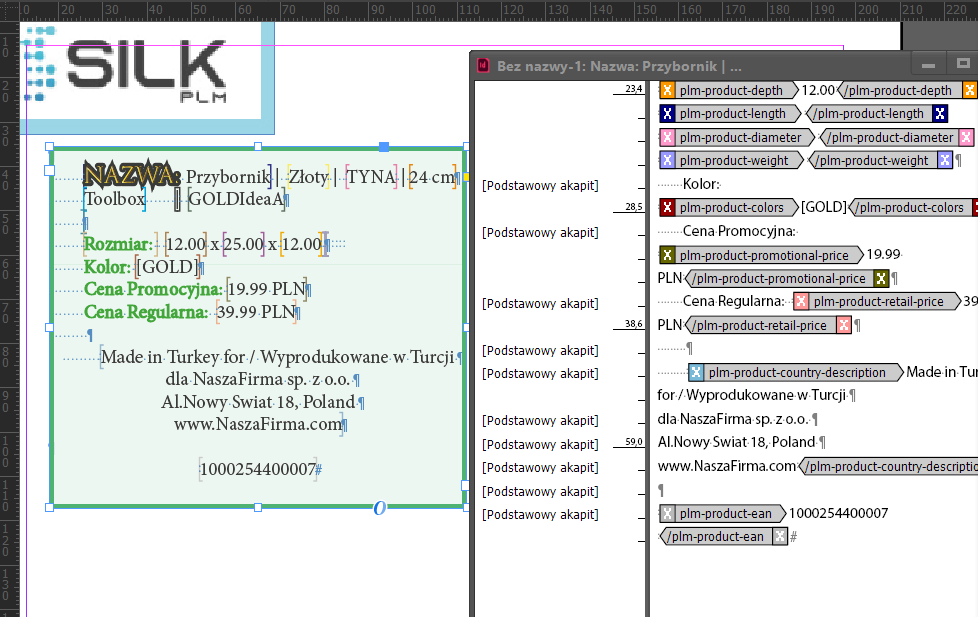
We can also make changes to the fields imported from the system. We will change the style of the tags added next to the NAME label and change the style in the description where the specified item was produced.
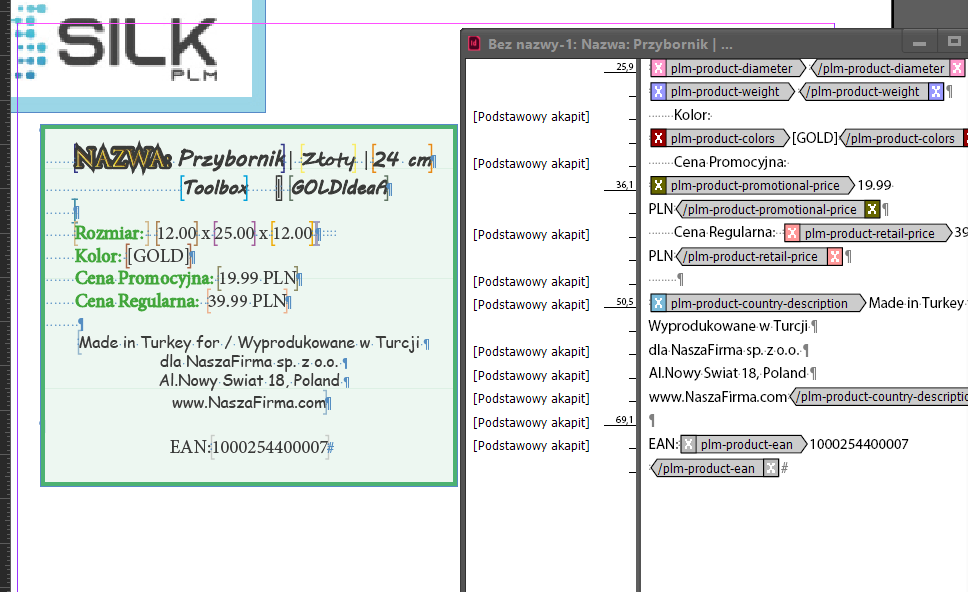
Save the document as an InDesign template (.indd format), then close and reopen it.
The close and reopen step is important because now we are opening an unnamed template instead of a named document. This allows us to reuse the template in multiple projects, which is especially useful if you create huge directories, such as having different documents with custom names for each category.
WHAT DOES THE ADDITIONAL MARK <PLM user data PLM clon> serve for ?
Using XML files, we will encounter two inconveniences in Adobe InDesign.
The first complication is that a given product we have in the document schema can only be used once on the document page itself.
That is, we cannot use one Tag twice on different templates because adding it to the second field makes it disappear from the first one.
The second inconvenience is that we can’t operate on the same XML in several places – removing unnecessary tags from one field – results in their complete removal from the Structure menu, which was uploaded with the XML, and they can’t be used in other places.
To get around this inconvenience, we added two additional tags to each XML. One of them is .
All tags that will be used repeatedly on the document should be copied to this tag.
ADDING TAGS.
1. Add a new tag in the list of all tags – we named it pendant
WINDOW→USES→MARKERS
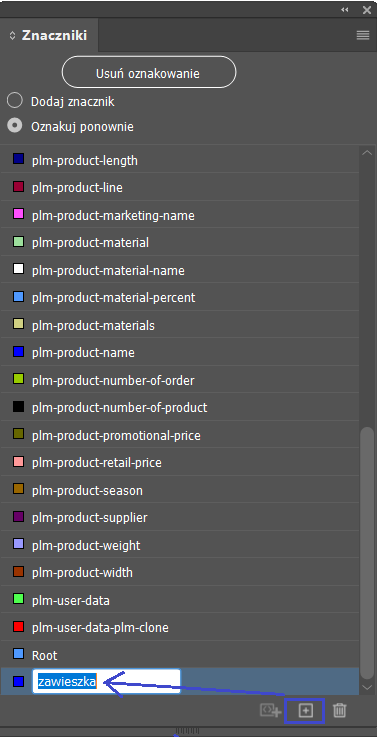
2. Now in the panel Structure Right-click and create New Element….
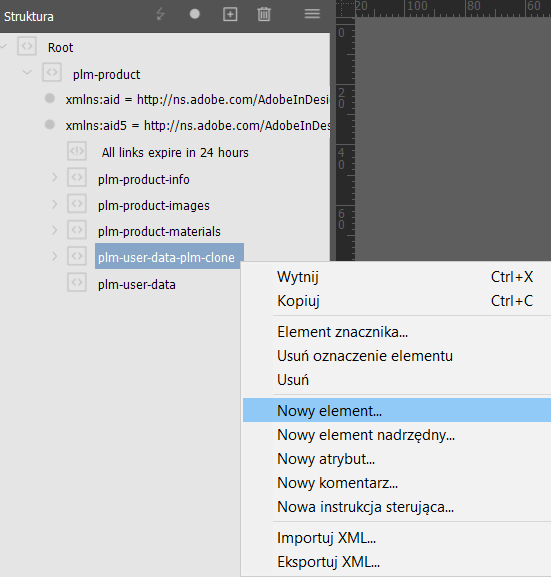
3. From the list, select the tag created earlier: zawieszka (hang tag).

4 The “zawieszka” has been added to <plm-user-data-clone>
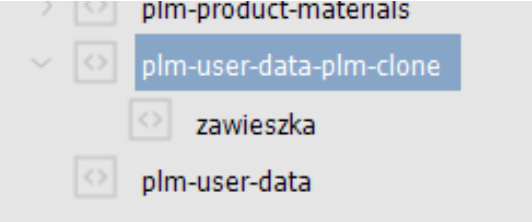
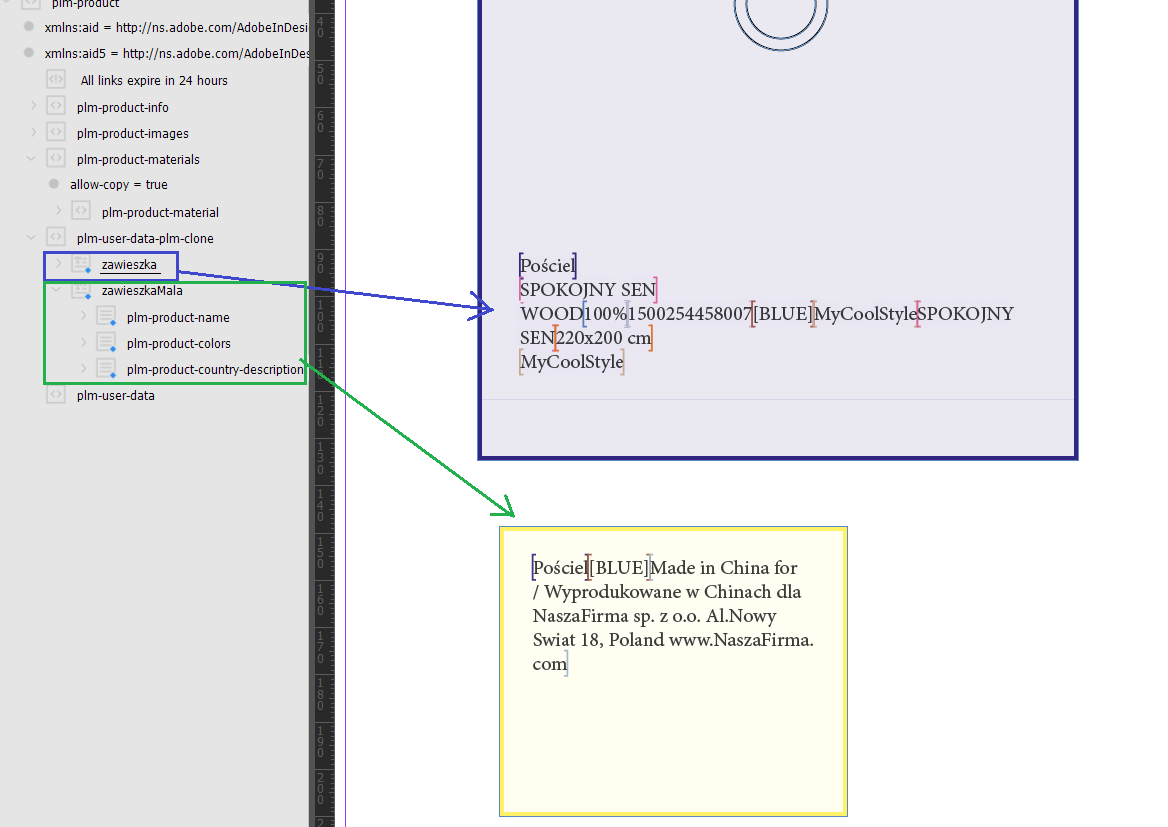
5. Now add (CONTROL+C → CONTROL+V) to the pendant field from the top of the panel Structure tags that we want to put on the pendant.

6. By using the <PLM user data PLM clon> and adding there a new element hang tag “Mala”, where we also copied some tags we can use multiple times on one document several of the same fields. Without <PLM user data PLM clon>would not be possible.
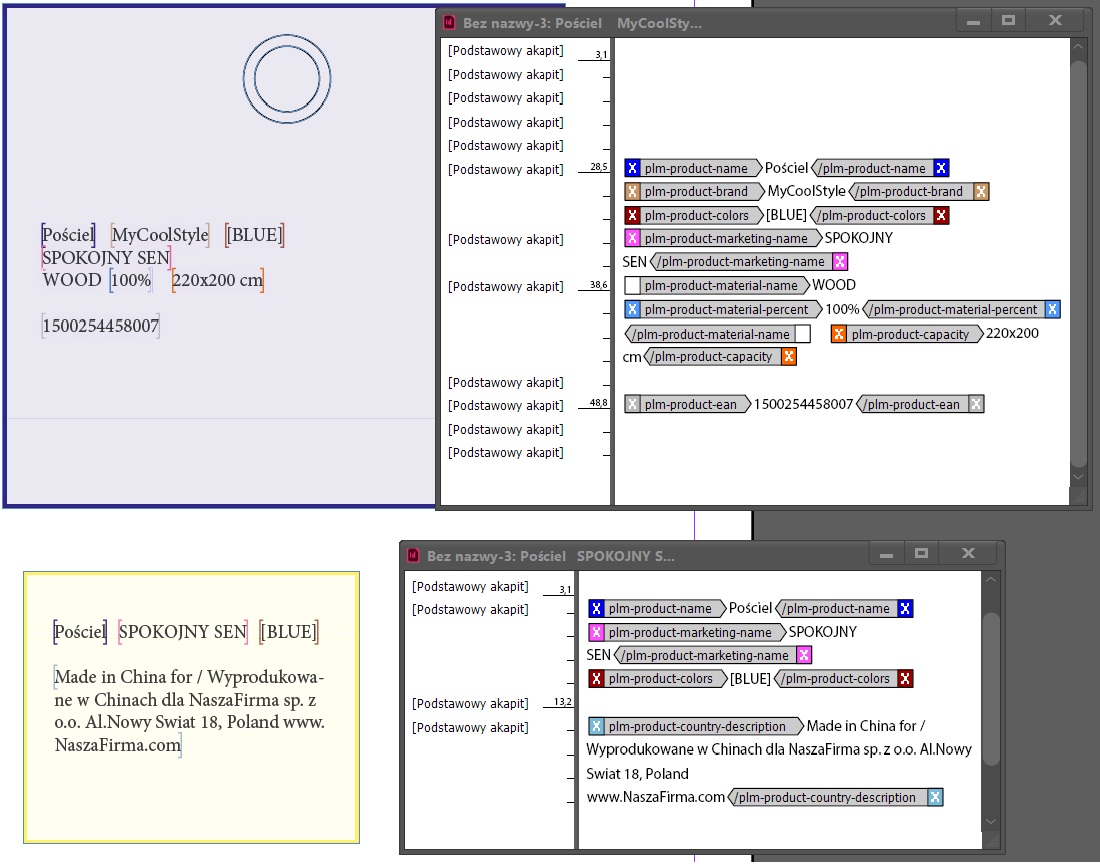
7. For each frame, we can start the Thread Editor CONTROL + Y
This will make it easier to arrange the tags on our pendant. Of course, the next step is to encase them with company-specific graphics.
With a little graphic processing, the pendant may look a little different:
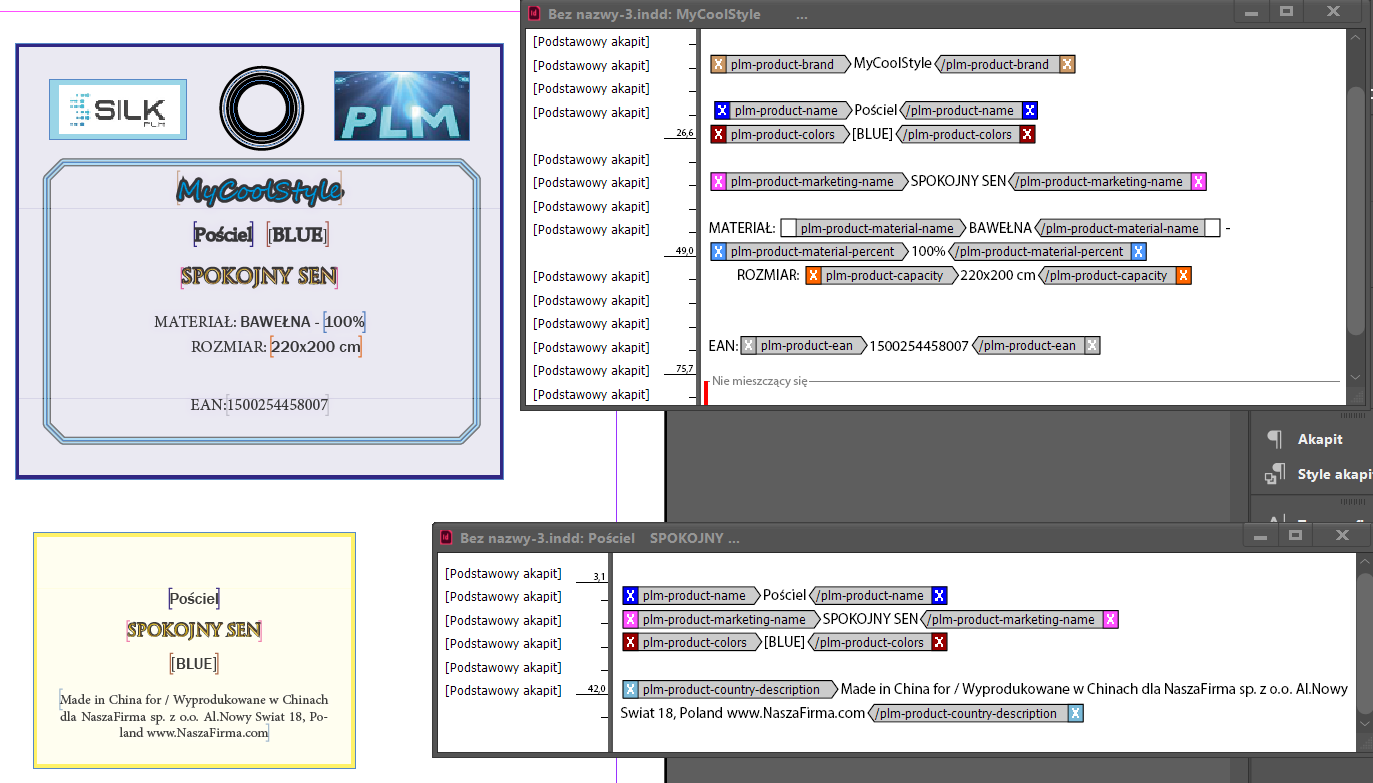
That is, all you need to do is put Tags in the appropriate places on the graphic. Such a graphic to plug into the product. The system will populate the tagged areas with data from this product. The branding element will then create itself automatically as it is rendered and the PDF document is created.
The role of the Graphic Designer is only to properly visualize the branding element and plug in the fields to be populated with data.
Elements that are not attached to any Tag will be fixed elements of the designed pattern (graphics, borders, fixed elements).
